Spring Tips #2: Layered JARs with Spring Boot 2.3
Using Docker containers for deployment of Java applications becomes more and more popular these days. To ship a new version of application you just build a Docker image with new version of JAR file and push it to the repository, so the deployment team can update it in the production. Soon, you will realize, that this approach (in the base scenario) has one big flaw.
Problem
Docker images are designed to be as lightweight and reusable as possible, so they are (in some way) similar to the Git repository design. A Docker image is described by incrementally added immutable changes (layers), so two different Docker images can share the common part (for example with OS libraries) and differ only by their top layers, which contain application code. This design allows to save:
- disk space – only one copy of the base layers is needed to be persisted for multiple different images
- network connection – only the image specific layers have to be transmitted if the recipient already has downloaded the common base layers
So, how creating a Docker image with Spring application can look like?
FROM adoptopenjdk:11-jre-hotspot
ARG JARFILE=target/*.jar
COPY ${JARFILE} app.jar
EXPOSE 8080
ENTRYPOINT ["java","-jar","/app.jar"]
Let’s create a sample Spring application and add a Dockerfile to it. We will use adoptopenjdk:11-jre-hotspot as a base image. The Dockerfile can look like as below:
Now, let’s pack the application with Maven and build the Docker image. We can see, that Docker created an image, so let’s run it and check, that it is working correctly by accessing http://localhost:8080. We can also check the layers of created image. This requires to run the commands shown below:
mvn clean package
docker build ./docker/ --tag sample-app:0.0.1
docker run -p 8080:8080 sample-app:0.0.1
curl http://localhost:8080
docker history --format "{{.ID}} {{.CreatedBy}} {{.Size}}" sample-app:0.0.1
The sample-app:0.0.1 image is created with layers:
b0667ce8e4f8 /bin/sh -c #(nop) ENTRYPOINT ["java" "-jar"… 0B
0e1cfee96496 /bin/sh -c #(nop) EXPOSE 8080 0B
1c13f9e1e69e /bin/sh -c #(nop) COPY file:52ed6af6f4d73120… 16.4MB
f002c27fb6c8 /bin/sh -c #(nop) ARG JARFILE=target/*.jar 0B
015147d37319 /bin/sh -c #(nop) ENV JAVA_HOME=/opt/java/o… 0B
<missing> /bin/sh -c set -eux; ARCH="$(dpkg --prin… 129MB
<missing> /bin/sh -c #(nop) ENV JAVA_VERSION=jdk-11.0… 0B
<missing> /bin/sh -c apt-get update && apt-get ins… 33.5MB
<missing> /bin/sh -c #(nop) ENV LANG=en_US.UTF-8 LANG… 0B
<missing> /bin/sh -c #(nop) CMD ["/bin/bash"] 0B
<missing> /bin/sh -c mkdir -p /run/systemd && echo 'do… 7B
<missing> /bin/sh -c set -xe && echo '#!/bin/sh' > /… 745B
<missing> /bin/sh -c [ -z "$(apt-get indextargets)" ] 987kB
<missing> /bin/sh -c #(nop) ADD file:c3e6bb316dfa6b81d… 63.2MB
Now, we want to make a minor change in the code (a bugfix or new feature) and release new version of the application. After the fix, we bump the version to 0.0.2, repeat the process of packaging the JAR and building the Docker image, we check the layers… and something seems wrong.
bb6335e1969d /bin/sh -c #(nop) ENTRYPOINT ["java" "-jar"… 0B
29fb2b339d38 /bin/sh -c #(nop) EXPOSE 8080 0B
8f8c54975226 /bin/sh -c #(nop) COPY file:de025d5e8cef2437… 16.4MB
f002c27fb6c8 /bin/sh -c #(nop) ARG JARFILE=target/*.jar 0B
015147d37319 /bin/sh -c #(nop) ENV JAVA_HOME=/opt/java/o… 0B
<missing> /bin/sh -c set -eux; ARCH="$(dpkg --prin… 129MB
<missing> /bin/sh -c #(nop) ENV JAVA_VERSION=jdk-11.0… 0B
<missing> /bin/sh -c apt-get update && apt-get ins… 33.5MB
<missing> /bin/sh -c #(nop) ENV LANG=en_US.UTF-8 LANG… 0B
<missing> /bin/sh -c #(nop) CMD ["/bin/bash"] 0B
<missing> /bin/sh -c mkdir -p /run/systemd && echo 'do… 7B
<missing> /bin/sh -c set -xe && echo '#!/bin/sh' > /… 745B
<missing> /bin/sh -c [ -z "$(apt-get indextargets)" ] 987kB
<missing> /bin/sh -c #(nop) ADD file:c3e6bb316dfa6b81d… 63.2MB
We would expect, that the minor change in the code would result in minor change in the Docker image, but it does not in this case. The new image shares the same root with previous one (up to the layer f002c27fb6c8), but the layer with the application JAR is different – and it results in storing additional data on the disk. It is “only” about 16 MB in this case, but consider the sizes of real production-ready JARs – it is often more than 100 MB and with frequent release cycle can use many gigabytes of storage space and increase network traffic to the Docker repository. It is the flaw, that I have mentioned at the beginning.
Is there any way to improve it? Of course it is. The answer is simple – split the JAR file into multiple layers. Since (almost) each layer is generated by the separate action in the Dockerfile, it is possible to create one layer with rarely changed data (e.g. dependencies) and include frequently changed application code in the top layer.
Until now, the process required to extract JAR content manually or with additional plugins and then to copy the content onto separate docker layers. This solution did not allow to easily include additional separation between project dependencies, which is a problem for multi-module applications as their internal dependencies change with every subsequent release. It also had no guarantee of classpath loading order, which might cause some problems [1, 2, 3].
But with the Spring Boot 2.3 comes a handy solution.
Getting started
For the example we will use the application created in the previous section.
First of all, we need to create a layered JAR. By default, Spring Boot splits the data in four layers:
- dependencies – includes all non snapshot dependency JARs
- spring-boot-loader – includes loader for JARs and classes
- snapshot-dependencies – includes all snapshot dependency JARs
- application – includes application code and resource files
To enable this feature, you only need to change `spring-boot-maven-plugin` configuration in the pom file. The result should look like as follows:
<plugin>
  <groupId>org.springframework.boot</groupId>
  <artifactId>spring-boot-maven-plugin</artifactId>
  <configuration>
     <layers>
        <enabled>true</enabled>
     </layers>
  </configuration>
</plugin>
Now, when we package the project and open the JAR, we will see two new files in BOOT-INF directory:
layers.idxclasspath.idx
The first one is more interesting from our point of view, because it declares the data, that should be included in each layer. The information about layers existing in given JAR is also available from outside the JAR by running `java -Djarmode=layertools -jar target/sample-app.jar list`. The output of the command should be as follows:
dependencies
spring-boot-loader
snapshot-dependencies
application
But having layered JAR does not resolve the problem – it is still one file, so it will be added as one file to the Docker image, so the second part of the job (a little more complicated) is required.
The layertools mode accepts also a second command – extract. When executed, it will then take layered JAR and unpack it into separate directories, one for each defined layer. We can use it, to build Docker image with each directory data in a separate layer! This way, the least often changed (and the most heavyweight) dependencies can be separated from the applications own code. This change also improves the performance in the production environment – it removes the overhead to extract the JAR file each time the container starts.
To automate the process we need to change the Dockerfile. We will use a multi-stage build. In the first stage, we will extract the content of the JAR with layertools and in the second, we will copy the data in layers to form a new image. The sample Dockerfile is shown below.
FROM adoptopenjdk:11-jre-hotspot as builder
WORKDIR application
ARG JAR_FILE=target/*.jar
COPY ${JAR_FILE} application.jar
RUN java -Djarmode=layertools -jar application.jar extract

FROM adoptopenjdk:11-jre-hotspot
WORKDIR application
COPY --from=builder application/dependencies/ ./
COPY --from=builder application/spring-boot-loader ./
COPY --from=builder application/snapshot-dependencies/ ./
COPY --from=builder application/application/ ./
ENTRYPOINT ["java", "org.springframework.boot.loader.JarLauncher"]
You can see, that it was also required to change the entrypoint – now there won’t be an application JAR to run with -jar parameter. Instead we can use the JarLauncher, which uses information gathered in layers.idx and classpath.idx to load and run the application.
Now, after packaging the layered jar and building an image, we will see that the application is spit between four layers, and (fortunately) the largest one with dependencies is before the frequently changed layer with application code (base layers omitted for brevity).
500f7fcde5b1    /bin/sh -c #(nop) ENTRYPOINT ["java" "org.s…     0B
2022b8a42af2    /bin/sh -c #(nop) COPY dir:dbb3b851c72c66de2…    7.87kB
959f8e2f4586    /bin/sh -c #(nop) COPY dir:5872c0ed4286bf863…    2.59MB
b2ebe0097956    /bin/sh -c #(nop) COPY dir:01e9c94696ee81574…    222kB
5bfee6516747    /bin/sh -c #(nop) COPY dir:48778f0d171f5215e…    13.7MB
769034089cdc    /bin/sh -c #(nop) WORKDIR /application           0B
To prove, that it works as intended, let’s make a minor change in application code and perform a release. We can see, that the new image reuses the layers from the previous one, so only about 8 KB of additional disk space is used (compare it to ~16 MB used previously).
33d9e6ee0c91    /bin/sh -c #(nop) ENTRYPOINT ["java" "org.s…     0B
aea5abff6481    /bin/sh -c #(nop) COPY dir:abd56a6a50bf39384…    7.85kB
959f8e2f4586    /bin/sh -c #(nop) COPY dir:5872c0ed4286bf863…    2.59MB
b2ebe0097956    /bin/sh -c #(nop) COPY dir:01e9c94696ee81574…    222kB
5bfee6516747    /bin/sh -c #(nop) COPY dir:48778f0d171f5215e…    13.7MB
769034089cdc    /bin/sh -c #(nop) WORKDIR /application           0B
Complications
Ok, we had our Hello world! with the layered JARs. Let’s now complicate things a little bit.
First of all, we would like to get rid of spring-boot-starter-parent from the pom and use only spring-boot-dependencies for dependency management. To do this, we remove <parent> section and add <dependencyManagement>. Remember to add proper plugin configurations – it is not inherited from parent pom anymore!
<dependencyManagement>
  <dependencies>
     <dependency>
        <groupId>org.springframework.boot</groupId>
        <artifactId>spring-boot-dependencies</artifactId>
        <version>2.3.0.RELEASE</version>
        <type>pom</type>
        <scope>import</scope>
     </dependency>
  </dependencies>
</dependencyManagement>
Quick check if it still works correctly and it is OK. Success!
Now we would like to add new maven module with application code to the project and treat the root pom as a parent to all application modules. It is an easy setup (do not forget to move the Dockerfile too!). Quick check if everything is working correctly (mvn package -> docker build -> docker run) – all is working as expected.
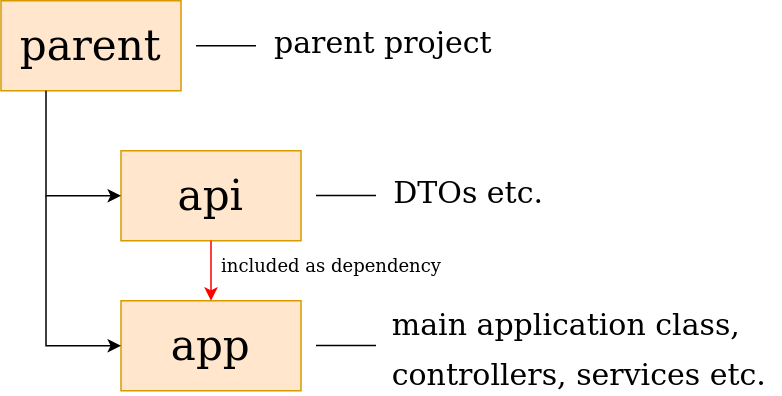
So, we would like to add another module, let’s say that it will be api, we add it as a dependency to the app module. This should lead us to the project structure as follows:
When it is done, we check again if it works and everything looks fine.
But!
If we check closer, we will see, that the dependency layer is no longer shared between our builds! What happened? The problem is (as always) with the defaults. As was stated before, all project dependencies are added to one layer. All – including the internal ones! So if the internal dependency changes (and it will happen with every consecutive release) the whole dependency layer will change. To solve this problem, we need to get dirty and override the defaults.
Defining custom layers
First of all, we need to add a file, that describes a configuration of JAR layers. To do that, simply add layers.xml file somewhere in the app module (I recommend src/layers/). The default file is something like:
<layers xmlns="http://www.springframework.org/schema/boot/layers"
     xmlns:xsi="http://www.w3.org/2001/XMLSchema-instance"
     xsi:schemaLocation="http://www.springframework.org/schema/boot/layers
                     https://www.springframework.org/schema/boot/layers/layers-2.3.xsd">
  <application>
     <into layer="spring-boot-loader">
        <include>org/springframework/boot/loader/**</include>
     </into>
     <into layer="application"/>
  </application>
  <dependencies>
     <into layer="snapshot-dependencies">
        <include>*:*:*SNAPSHOT</include>
     </into>
     <into layer="dependencies"/>
  </dependencies>
  <layerOrder>
     <layer>dependencies</layer>
     <layer>spring-boot-loader</layer>
     <layer>snapshot-dependencies</layer>
     <layer>application</layer>
  </layerOrder>
</layers>
We can see all the layers, that were created by default. To add a new layer for the project internal dependencies, we can simply add new one in the <dependency> section. We want all artifacts with groupId of the project to be added into that layer. The definition will look like:
<into layer="internal-dependencies">
  <into layer="internal-dependencies">
  <include>com.tratif.layers:*:*</include>
</into>
The <include> schema is groupId:artifactId:version and allows to use Ant matcher patterns. We want to add a layer containing all internal dependencies regardless of their version, so we use wildcard to match every artifactId and version with the specified groupId.
Important note here is that every <into> section operates on the remainder from the ones declared before, so ordering matters. In the example layers.xml file above, the snapshot-dependencies layer collects these dependencies, that contain SNAPSHOT in their versions. The remaining ones are passed to the next layer filter (in this case the dependencies layer).
For our purpose, we will add it between snapshot-dependencies and dependencies – we do not want any snapshots on that layer. You can notice, that application and dependencies layers do not have <include> directive – it means, that they will match everything, that is not matched by the previous layers (just like <include>*:*:*</include>). We also need to include the new layer in <layerOrder> section. The resulting layers.xml file looks like:
<layers xmlns="http://www.springframework.org/schema/boot/layers"
     xmlns:xsi="http://www.w3.org/2001/XMLSchema-instance"
     xsi:schemaLocation="http://www.springframework.org/schema/boot/layers
                     https://www.springframework.org/schema/boot/layers/layers-2.3.xsd">
  <application>
     <into layer="spring-boot-loader">
        <include>org/springframework/boot/loader/**</include>
     </into>
     <into layer="application"/>
  </application>
  <dependencies>
     <into layer="snapshot-dependencies">
        <include>*:*:*SNAPSHOT</include>
     </into>
     <into layer="internal-dependencies">
        <include>com.tratif.layers:*:*</include>
     </into>
     <into layer="dependencies"/>
  </dependencies>
  <layerOrder>
     <layer>dependencies</layer>
     <layer>spring-boot-loader</layer>
     <layer>internal-dependencies</layer>
     <layer>snapshot-dependencies</layer>
     <layer>application</layer>
  </layerOrder>
</layers>
Now we need to include new layer in the Docker image. It is very simple addition to Dockerfile, just add new COPY directive in proper place. The Dockerfile will now look like:
FROM adoptopenjdk:11-jre-hotspot as builder
WORKDIR application
ARG JAR_FILE=target/*.jar
COPY ${JAR_FILE} application.jar
RUN java -Djarmode=layertools -jar application.jar extract

FROM adoptopenjdk:11-jre-hotspot
WORKDIR application
COPY --from=builder application/dependencies/ ./
COPY --from=builder application/spring-boot-loader ./
COPY --from=builder application/internal-dependencies ./
COPY --from=builder application/snapshot-dependencies/ ./
COPY --from=builder application/application/ ./
ENTRYPOINT ["java", "org.springframework.boot.loader.JarLauncher"]
Now package the JAR, build the Docker image and run it. Hurray, it is working! You may see, that with every new release, the dependencies layer is reused (until you add a new dependency or update its version).
This brings us to the end of the article. As a good advice I suggest you to add one more layer before internal-dependencies, containing your company dependencies (e.g. clients from other projects or some common utils), for example:
<into layer="company-dependencies">
  <include>com.tratif*:*:*</include>
</into>
Wrap-up
In this article we had some insight into building and using layered JARs with new Spring Boot features. From some simple configuration, that might be suitable for smaller projects (containing only one module), we moved to more advanced (but still easy to do) configuration, which might be used in larger projects.
I hope, that the examples illustrated the problem clearly and convinced you to start using layered JARs in your everyday projects.
Thanks,Sir。 Your article saved my hours.
Love from China. Have nice day.